InstallationBack to top
You can install Wordpress themes one of two ways:
- FTP: Extract the sin21-wp-S301.zip file and upload the extracted theme folder to the
/wp-content/themes/directory of your WordPress installation. - WordPress dashboard: In your admin panel, go to Appearance → Themes and click the Add New button at the top of the page. Then click the Upload button at the top of the page. Choose the sin21-wp31.zip file from your computer and click Install Now.
After installing the theme, you must activate it. In your admin panel, go to Appearance → Themes and hover over the theme's preview thumbnail. Click the Activate button next to the theme's name.
▸ Recommended plugins: Classic Editor and Classic Widgets
Tip: To read more about installing themes correctly: WordPress Adding New Themes.
CustomizerBack to top
This theme is customizable via the WordPress Customizer. Here, you can change the available theme options, manage your menus, and add widgets to your sidebar. To access the theme customizer, click Appearance → Customize in the WordPress Admin menu.
Tip: You can use the following HTML tags in all the fields in this section: <em>, <b>, <a>, <span>.
Site Identity
- Blog Title: The site title/name to appear on your theme. Use the <span> tag to use alternating accent color on the text in the title.
- Site Icon: This icon is used for a variety of purposes. Most well known for being a "fave icon" which displays in your browsers bookmark bars, browser tabs and more.
Colors
- Dark Theme: This theme comes with a built-in "Dark Theme" which overrides the default styling by turning the theme from light to dark. This can be turned on to override the default light styling 24/7.
- Guest Night Mode: This theme comes built-in with a "Night Mode" Switch feature. Using a small amount of Javascript it will save the theme chosen by your guests via Browser Cookies so when they visit in the future it will be automatically apply their preference.
 Options for this feature include:
- "Always On" (Default)
- "Mobile Only" - Switch button will be visible on Mobile version only.
- "Desktop Only" - Switch button will be visible on Desktop version only.
- "Turn Off" - Switch button will be hidden and disabled.
▸ Default Setting: Always On - Theme Accent: Change the accent color used on the theme. Applies to text, background and border colors as styled in the coding.
- Theme Accent Text Color: Change the text accent color used on the theme. This allows you to adjust the color of any text using the Theme Accent as a background color thus making sure it's readable.
Theme Options: Header Image

- Current Header: Upload your choice of photo or custom made header. This will replace the biggest of the two images in the header.
- Smaller Header: This is where you can upload your choice of photo to replace the default one on the theme. This is the smaller image that sits overlaying the larger one.
- Mini Circle Photo: This is where you can upload your choice of photo to replace the miniature photo in the circle above the welcome box.

- Current Header: Upload your choice of photo or custom made header. This will replace the biggest of the two images in the header.
- Smaller Header: Upload your choice of photo to replace the default smaller image that sits overlaying the larger one.
▸ Note: This Header Style also has the option to hide the secondary smaller image.
Theme Options: Header Options
- Header Layout: Choose between two built-in header layout styles. The first is the default layout you see in the live preview. The second style uses a full header template which allows you to use an average fansite header or high quality photo for your theme.

Default Header Style
This is the default header style for the theme. It features one mid-size header image overlayed with a smaller header image, a mini circle icon and welcome message area with the site name featured below.
Full Header Style
This style uses an alternate header.php file to provide you with a different header template featuring a full-width banner with the option to remove the smaller overlayed image. This places the site title next to the navigation menu and removes the welcome text area and mini circle image. - Default Layout Welcome Message: Display your own unique welcome message to greet visitors.
▸ Note: This layout feature is hidden when Full Header Style is chosen.  Full Header Layout Site Title Icon: When selected, this style has an additional feature which adds an icon next to your site title/name that you can change by choosing the icon of your choice.
Default Setting: Star Icon
This icon is hidden on the Default Header Layout style.
▸ Hide/Show Elements: Header: Website Title (Name), Header: Mini Circle, Header: Smaller Header Image
Theme Options: Layout Options
-
Blog Layout: Choose the way the posts will be displayed on the homepage and archives.
▸ Styles Included:- Full Post (Default)
- Grid
- List
- 1 Full Post then Grid
- 1 Full Post then List
- Rounded Borders: Soften the sharp corners by applying rounded borders to all square and image elements with a flip of a switch.
- Sidebar Position: Display the sidebar on the left or right to the posts and pages.


Theme Options: Font Options
- Navigation Font: Change the navigation font from the built-in options included in the theme.
▸ Fonts Included:- Montserrat (Default)
- Oswald
- Merriweather
- Navigation Font Style: Choose the font style of your choice for the navigation.
▸ Style Options:- Normal
- Bold
- Italic
- Bold Italic
- ALL CAPS
- BOLD ALL CAPS (Default)
- ITALIC ALL CAPS
- BOLD ITALIC ALL CAPS
- Body Font: Change the global body font from the built-in options included in the theme.
▸ Fonts Included:- Open Sans (Default)
- Lato
- Merriweather
- Heading Font: Change the global heading font from the built-in options included in the theme.
▸ Fonts Included:- Playfair Display (Default)
- Montserrat
- Oswald
- Heading Font Style: Choose the font style of your choice for the navigation.
▸ Style Options:- Normal
- Bold (Default)
- Italic
- Bold Italic
- ALL CAPS
- BOLD ALL CAPS
- ITALIC ALL CAPS
- BOLD ITALIC ALL CAPS
Theme Options: Post Options
This section features a variety of options you can choose to hide to further customize the theme to your preference and needs. The following items can be hidden:- Hide Breadcrumb Navigation:
Hide the breadcrumb navigation shown when viewing a single post or page. - Hide Post Author:
Hide the post author which is shown with the post meta information included in each post. - Hide Comments Link:
Hide the comments link if you prefer to remove the comments discussion feature altogether. - Hide Post Tags:
Hide the post tags visible when viewing a single post. - Hide Share Buttons:
Hide the share buttons shown at the bottom of each post and page. - Hide Author Biography:
Hide the author biography shown below the post content when viewing a single post. - Hide Related Posts:
Hide the related posts that are shown when viewing a single post.
Example URL: https://your-website.com/wp-admin/profile.php
Theme Options: Footer Options
Recent Photos Widget Area
- Recent Photos Caption: Change the caption to the image feed widget title.
Default: [ Hosting over 14,000 photos to browse through. ] - Gallery Link Text: Change the link text for the gallery link.
Default: Photo Gallery - Gallery Link URL: Include the URL to your gallery.
Site Footer
- Blog Name: Displays the title of your website or URL.
Default: © 2005-2021 Your Blog Name - Additional Footer Links:: Add additional links as needed.
Other Sections
- Menus: You can manage your menus in this panel, including setting their location.
- Widgets: You can configure your widgets in this panel and see your changes live.
- Homepage Settings: Set a page to be your homepage and/or a location for your posts.
- Additional CSS: Add your custom CSS here to overwrite/add to the theme styling.
Tip: To read more about using the WordPress customizer: WordPress Appearance Customize Screen.
MenusBack to top
This theme supports 4 types of menus: a primary menu, 2 separate social icons menus and a footer menu for your gallery links.
As mentioned, this theme features 2 separate locations for your Social Icons to be displayed. You can use the same social links menu to be displayed in both locations or you can create 2 unique menus for each location.- Sidebar Social Icons Menu: Seen at the top of your sidebar above the rest of your widgets.
▸ Important Note: This menu will only show on your theme when the "Sidebar: Social Icons Menu" has active links in it. If "Sidebar: Social Icons Menu" doesn't exist or has no active links it will fallback on the "Mobile: Social Icons Menu" and display that menu if it exists. If neither menu exists or has active links then nothing will appear on your sidebar.
▸ Ideal use: The perfect way to feature separate links to the official social pages of your site subject. These do not have to be your social pages if you wish to display two sets of social links.
▸ This menu allows for unlimited social links to be displayed. - Mobile Social Icons Menu: Seen only on the mobile version of your theme and is featured on your mobile menu top bar.
▸ Ideal use: An easy way to display all your very own social pages for ease of access when browsing on mobile. ▸ This menu allows for unlimited social links to be displayed.
Primary Menu
This menu allows for link children. If a link as children it will allow for a dropdown menu to appear when the link is hovered over in Desktop mode and a clickable slide-out feature in Mobile.Anything deeper than one level of link children will not show and/or break the menu.
- WordPress menus can be found under Appearance → Menus.
- If you don't have a menu already, click create a new menu to create one.
- On the left side of the Menu page, choose the pages/posts/links/categories to add to your menu and click Add to Menu.
- Now that you have the menu created, you need to assign it to the Primary Menu in the Theme Locations section.
- Save the menu when finished.
Social Icons Menu
- To add a social icon menu, go to Appearance → Menus.
- If you don't have a menu already, click create a new menu to create one.
- On the left side of the Menu page, click the Custom Links menu item to add to your social links.
- Add the URL for each of your social profiles and a label for the link. The theme will do the work for you by detecting which site you are linking to and display the matching icon accordingly.
▸ 32 Supported Sites: email (/contact/, /contact or mailto:), RSS Feed (rss, feed=, /feed/ or /feed), apple.com, blogger.com, dailymotion.com, deviantart.com, discord.com, dropbox.com, ebay.com, etsy.com, facebook.com, flickr.com, google.com, pay.google.com, plus.google.com, goodreads.com, instagram.com, messenger.com, patreon.com, paypal.com, skype.com, snapchat.com, soundcloud.com, spotify.com, tiktok.com, tumblr.com, twitter.com, twitch.tv, vimeo.com, vk.com, yahoo.com, youtube.com, weibo.com, wikipedia.com, wordpress.com - Now that you have the menu created, you need to assign it to the Sidebar: Social Icons Menu and Mobile: Social Icons Menu in the Theme Locations section.
- Save the menu when finished.
Footer Gallery Menu
This menu is specifically for the use of adding links to your most visited and or popular gallery categories or albums. This shines a spotlight on the chosen links you choose to display.Tip: Try to keep the link titles under 25 characters.
- WordPress menus can be found under Appearance → Menus.
- If you don't have a menu already, click create a new menu to create one.
- On the left side of the Menu page, choose the pages/posts/links/categories to add to your menu and click Add to Menu.
- Now that you have the menu created, you need to assign it to the Footer Gallery Links in the Theme Locations section.
- Save the menu when finished.
Tip: To read more about using the WordPress menus: WordPress Menu User Guide.
WidgetsBack to top
This theme displays widgets in the sidebar of the posts and pages. Add widgets to the sidebar by going to Appearance → Widgets and adding widgets to the Sidebar Widgets panel.
Tabber Widget
A built-in feature is a Tabbed Content widget you can place your sidebars. You can create up to 2 unique tabbed widgets and include them multiple times among your sidebars.▸ Plugin credit: Milan Petrovic (dev4press.com)
- Navigate to Appearance → Widgets
 Now look under Available Widgets on the left-hand side of your screen and you should see "D4P Smashing Tabber" as a choice.
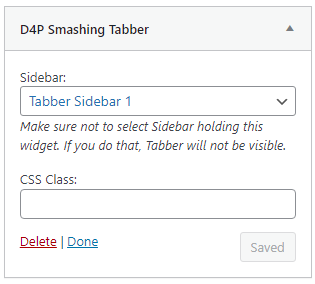 Once you've chosen which sidebar you wish to add the "D4P Smashing Tabber" widget to, you should see the option to choose which sidebar will be used in the tabbed widget. For example, the photo to the right shows I've chosen the "Tabber Sidebar 1" for the tabbed widget.
The sidebar you choose will be where you add the widgets you wish to feature in your tabbed content. Once you've chosen which sidebar you want to be used as your Tabbed Widget you can begin to add widgets to that sidebar. For example, in the photo to the right I have added 3 separate widgets to the "Tabber Sidebar 1" which will then be used as the 3 tabbed choices on the tabbed widget.
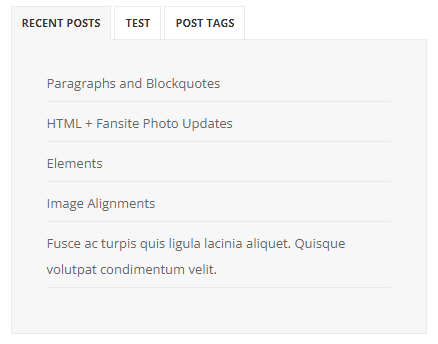 Your tabbed widget will then show on your theme like the example photo to the right.
How to use:
Footer Widget: Photo Gallery Feed
Put a spotlight on your photo gallery using the full-width photo feed from your Coppermine Gallery's latest uploads in the footer of the theme.To display the latest uploaded images from your Coppermine Gallery installation you will need the help of the free Coppermine plugin CPMFetch.
- Install and activate the plugin in your gallery following the instructions below:
- Download the copperminefetch_2.0.1.zip file from the link above. Unzip the package and upload the files into a new folder named cpmfetch within your gallery directory where you installed Coppermine.
- Open up a new tab in your browser. Type in your gallery URL followed by /cpmfetch/install.php and press enter. You should see a page that looks like this.
- Click the link that says:
Click here to run the install [OPTIONAL]
You should see a page that looks like this. - Pay attention these two codes:
include "./gallery/cpmfetch/cpmfetch.php";
$objCpm = new cpm("./gallery/cpmfetch/cpmfetch_config.php");
Your install will automatically configure the correct path to your gallery on your server. So when using the example code shown below, make sure the path to your gallery (aka your gallery folder name) is correct and matches what was shown on your install page otherwise it won't be able to connect with your gallery and may cause issues with your theme.
- Tip: This part of the coding:
$objCpm->cpm_viewLastAddedMedia(1,6);is also important.
The number 1 represents how many rows of photos you wish to display.
The number 6 represents the amount of photos you want to display in that row.
The ideal numbers for this theme would be 1,6
- Once CPMFetch is installed, go to Appearance → Widgets.
- Add a PHP-enabled widget to the Footer Widgets panel.
- Add the PHP code to the widget and save it.
CPMFetch PHP Code:
Copy and paste this code into a PHP-enabled widget in your footer section:
<?php include "../cpg/cpmfetch/cpmfetch.php";
	$objCpm = new cpm("../cpg/cpmfetch/cpmfetch_config.php");
	$options = array('windowtarget' => '_blank', 'tablestyle' => 'cpmfetchtable', 'imagestyle' => 'tooltip image');
	$objCpm->cpm_viewLastAddedMedia(1,6,$options);
	$objCpm->cpm_close();
?>
Important: Make sure you have installed a WP plugin like PHP Code Widget, as PHP code doesn't work in widgets.
Footer Widgets
This theme displays (3) widgets in the footer. Go to Appearance → Widgets and add widgets to the Footer Widgets panel.
Tip: To read more about using the WordPress widgets: WordPress Widgets.
Image SizesBack to top
Current Header image allows for flexible width with a fixed height of 450.
- Default Layout Header Image: 700w x 450h
- Full Header Layout Header Image: 1300w x 450h
- Smaller Header Image: 325w x 350h
- Mini Circle Image: 100w x 100h
- Featured Images: 850w x 325h (1200w x 400h or larger recommended)